Thursday, July 27, 2017

Running ipfire in a Proxmox KVM

Long ago my network equipment at home was simple: just used a Belkin N600 router to connect to my ISP. All my computers and devices, including some raspberry pi, mobile phones and pads will access the internet via the router. As the number of clients increased, I found that the Belkin router did not serve well. Therefore I installed a software firewall, IPFire, on a Raspberry Pi (Model B) and replace the existing router. (I still needed the N600 as a wireless bridge so I switch it to a bridge mode)

IPFire is a great software firewall. You can have a look at the website so see the features. Running IPFire on Raspberry Pi is surprisingly stable too. Everything was fine until I change the ISP plan from 8M (8mbps/1mbps)  to 100M (100mbps/30mbps).

The problem was the hardware limitation of the Raspberry Pi. The builtin LAN and another usb ethernet adapter worked fine when I was using 8M. However after I changed to use the 100M plan I found that the maximum speed was 30M something. In order to utilize my bandwidth I planned to run IPFire on another hardware.

I didn't have a big budget at that time so I wondered if I can make use of my existing hardware. My N54L that is running proxmox seems to be a good choice. So I decided to create a KVM for this.

The config of the IPFire VM is simple:
1. 512M ram
2. 1 CPU
3. 16GB virtual disk (virtio driver)
4. one bridged network (virtio driver)

One tricky thing I have done was to passthrough USB adapter from host to the VM, which should have a better performance.

By running lsusb on host:
# lsusb
...
Bus 003 Device 002: ID 0bca:8133 Realtek Semiconductor Corp. RTL8153 Gigabit Ethernet Adapter
Bus 003 Device 001: ID 1d6b:0003 Linux Foundation 3.0 root hub
...
Then add a line at /etc/pve/qemu-server/.conf
usb0: host=0bca:8133,usb3=yes

note that only use "usb3=yes" if you are using a usb3 device.

When the setting was done, I started the VM, the USB adapter was detected and just followed the instruction to setup. In my case I connected USB adapter to RED (internet), the virtual adapter to GREEN (internal). As I did a IPFire configuration backup from raspberry pi. I just import it back to the VM and everything ran out of the box!

I did a quick test by running the command line version of speedtest (speedtest-cli). the result was 80mpbs/26mbps which is acceptable.

[root@ipfire ~]# ./speedtest-cli
Retrieving speedtest.net configuration...
Testing from XXXXXXX (xxx.xxx.xx.xxx)...
Retrieving speedtest.net server list...
Selecting best server based on ping...
Hosted by xxxxxxxx[22.51 km]: 8.898 ms
Testing download speed................................................................................
Download: 81.54 Mbit/s
Testing upload speed................................................................................................
Upload: 25.93 Mbit/s

In summary IPFire is a good solution if you want to have a software firewall. There are other free firewalls such as pfsense or opnsense. I will try them and compare. But for now, I am happy to use IPFire.

Wednesday, June 28, 2017

Playing Yeelight with Python

Recently I've been playing a Yeelight Smart LED Bulb. It'd be a good starting of learning home automation, as such smart LED Bulbs do not depend on any modification of your home electricity system. This yeelight bulb is already bundled with the WIFI chip so that you can configure it using its official app (both Android and iOS are available)

Using the official app is straight forward, then I wondered can I play it 'harder'. Then I searched and found some interest use cases:

  1. Controlling yeelight by Python
  2. Controlling yeelight by Siri (wow!)
  3. Controlling yeelight by Home-Assistant
In fact there should be more cases, including Amazon Alexa or Google Home, but I do have these products and the setup will be very similar to 2. and 3, that I will explain it in another post later. Right now I am going to share how to play the yeelight with python.

First, you need the official app to enable developer mode. Then just use python yeelight package https://yeelight.readthedocs.io/en/latest/ and you are good to go!

import yeelight
yeelight_ip='xxx.xxx.xx.xxx' # your yeelight bulb IP
light = yeelight.Bulb(yeelight_ip, effect='smooth')
light.turn_off()
light.turn_on()

# Set it to white
light.set_rgb(255,255,255)
# Set the brightness
light.set_brightness(100)


Not very difficult right? If you have a raspberry Pi you can set some cronjobs in order to turn the light on in the morning as a silent  alarm clock, or place the bulb in your kid's bedroom, then change the brightness from 100% to 1% (then off, of course) in one hour.

If you think it's too dummy to control such a bulb, I agree. That's why there will be some more elegant solutions. Next time I'll show how I setup a virtual HomeKit and ask Siri to control the bulb.

Ref:

Saturday, June 03, 2017

Nextcloud on Archlinux

Recently I'm trying Nextcloud, which is a fork of Owncloud.

I have to admit that I am not a big fan of PHP apps. When I tested Owncloud several years ago I only felt it's very slow.....As someone recommended Nextcloud a few weeks ago I'd like to give it a try.

The installation doc was well but since it is only for Redhat and Ubuntu. I'd like to add some notes when using Archlinux (with Nginx, PHP-FPM, Mariadb, Redis Server):


  1. The official packages are needed ("pacman -Sy nginx, php-fpm, mariadb, redis")
  2. The AUR package php-smbclient is needed if you want to use the external storage feature with SMB/CIFS
  3. Using memory caching can improve the performance. From the doc you can choose APCu, Memcached and Redis. I am using Redis server since it should be most flexible approach. AUR package php-redis, again, is needed.
  4. Download the latest Nextcloud package. Extract and put it under /var/www
  5. under /etc/php/php.ini, make sure these lines are uncommented:
    zend_extension=opcache.so
    extension=pdo_mysql.so
    extension="smbclient.so"
    extension="redis.so"
  6. Following the official method to setup Nginx 
  7. Enable the services so that they will bring up after a reboot. (systemctl enable xxx)
  8. Using SSL is highly recommended. It's very easy to get one from Let's Encrypt with zero cost.
I will setup a container on my proxmox and evaluate for a while and give a brief review about it  later.

Thursday, September 01, 2016

Eclipse Che setup - on a server with Docker

If you take a look at the official site you'll see the installation is super easy - just a single line:

docker run --rm -t -v /var/run/docker.sock:/var/run/docker.sock eclipse/che start

Of course it is assumed that you have Docker 1.8 or later installed.

If you run it in your desktop or laptop, you can start using it. Just go to "http://localhost:8080" and create a workspace for your development:


Since I am going to install it on my HP N54L server (ArchLinux), I need to put from environment variables:

docker run --rm -t -e CHE_HOST_IP= -v /var/run/docker.sock:/var/run/docker.sock  eclipse/che  stop

Then I can go ot "http://:8080" to enjoy this web IDE.

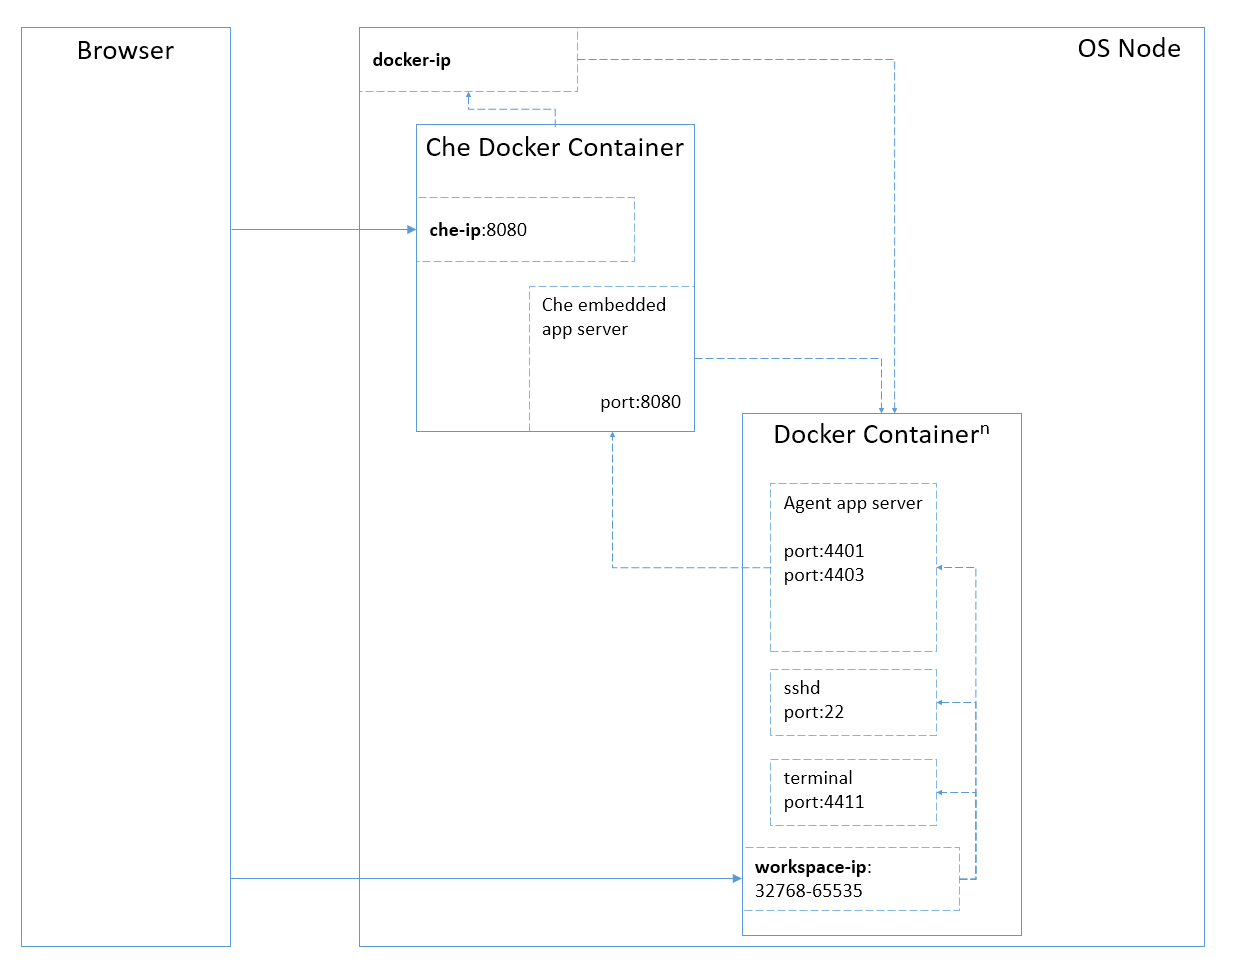
Another thing I discover is that if you run "docker ps" you will see:

CONTAINER ID        IMAGE                                                                       COMMAND                  CREATED             STATUS              PORTS                                                                                                                       NAMES
6b5cf5c1c0e9        eclipse-che/workspacef2v2k7ltal4gbsxp_machineph3hokyhknjhxa90_che_default   "/home/user/entrypoin"   42 hours ago        Up 42 hours         0.0.0.0:32817->22/tcp, 0.0.0.0:32816->4401/tcp, 0.0.0.0:32815->4403/tcp, 0.0.0.0:32814->4411/tcp, 0.0.0.0:32813->8080/tcp   workspacef2v2k7ltal4gbsxp_machineph3hokyhknjhxa90_che_default
ac63c449f4b8        codenvy/che-server:latest                                                   "/home/user/che/bin/c"   42 hours ago        Up 42 hours         8000/tcp, 0.0.0.0:8080->8080/tcp                                                                                            che-server


Just remember do not stop it by running "docker stop che-server". I did once and when I start the che-server my previous setting, including workpsaces and projects were gone.

Instead, we should run 

docker run --rm -t -e CHE_HOST_IP= -v /var/run/docker.sock:/var/run/docker.sock  eclipse/che  stop

Or simply download the start/stop script from eclipse.org:

curl -sL https://raw.githubusercontent.com/eclipse/che/master/che.sh > che
then run
 ./che start / stop / restart

for my case I need to set the environemnt:
CHE_HOST_IP=je54 ./che  start
CHE_HOST_IP=je54 ./che  stop

Eclipse Che (coding within a browser)

I am not a professional programmer or developer. But I do need to code time to time. 90% of my coding is done with "vi". It's very powerful if the project is small. I also tried atom.io or sublime text, but they are just too powerful that I don't want to invest too much time. Then I found Eclipse Che.

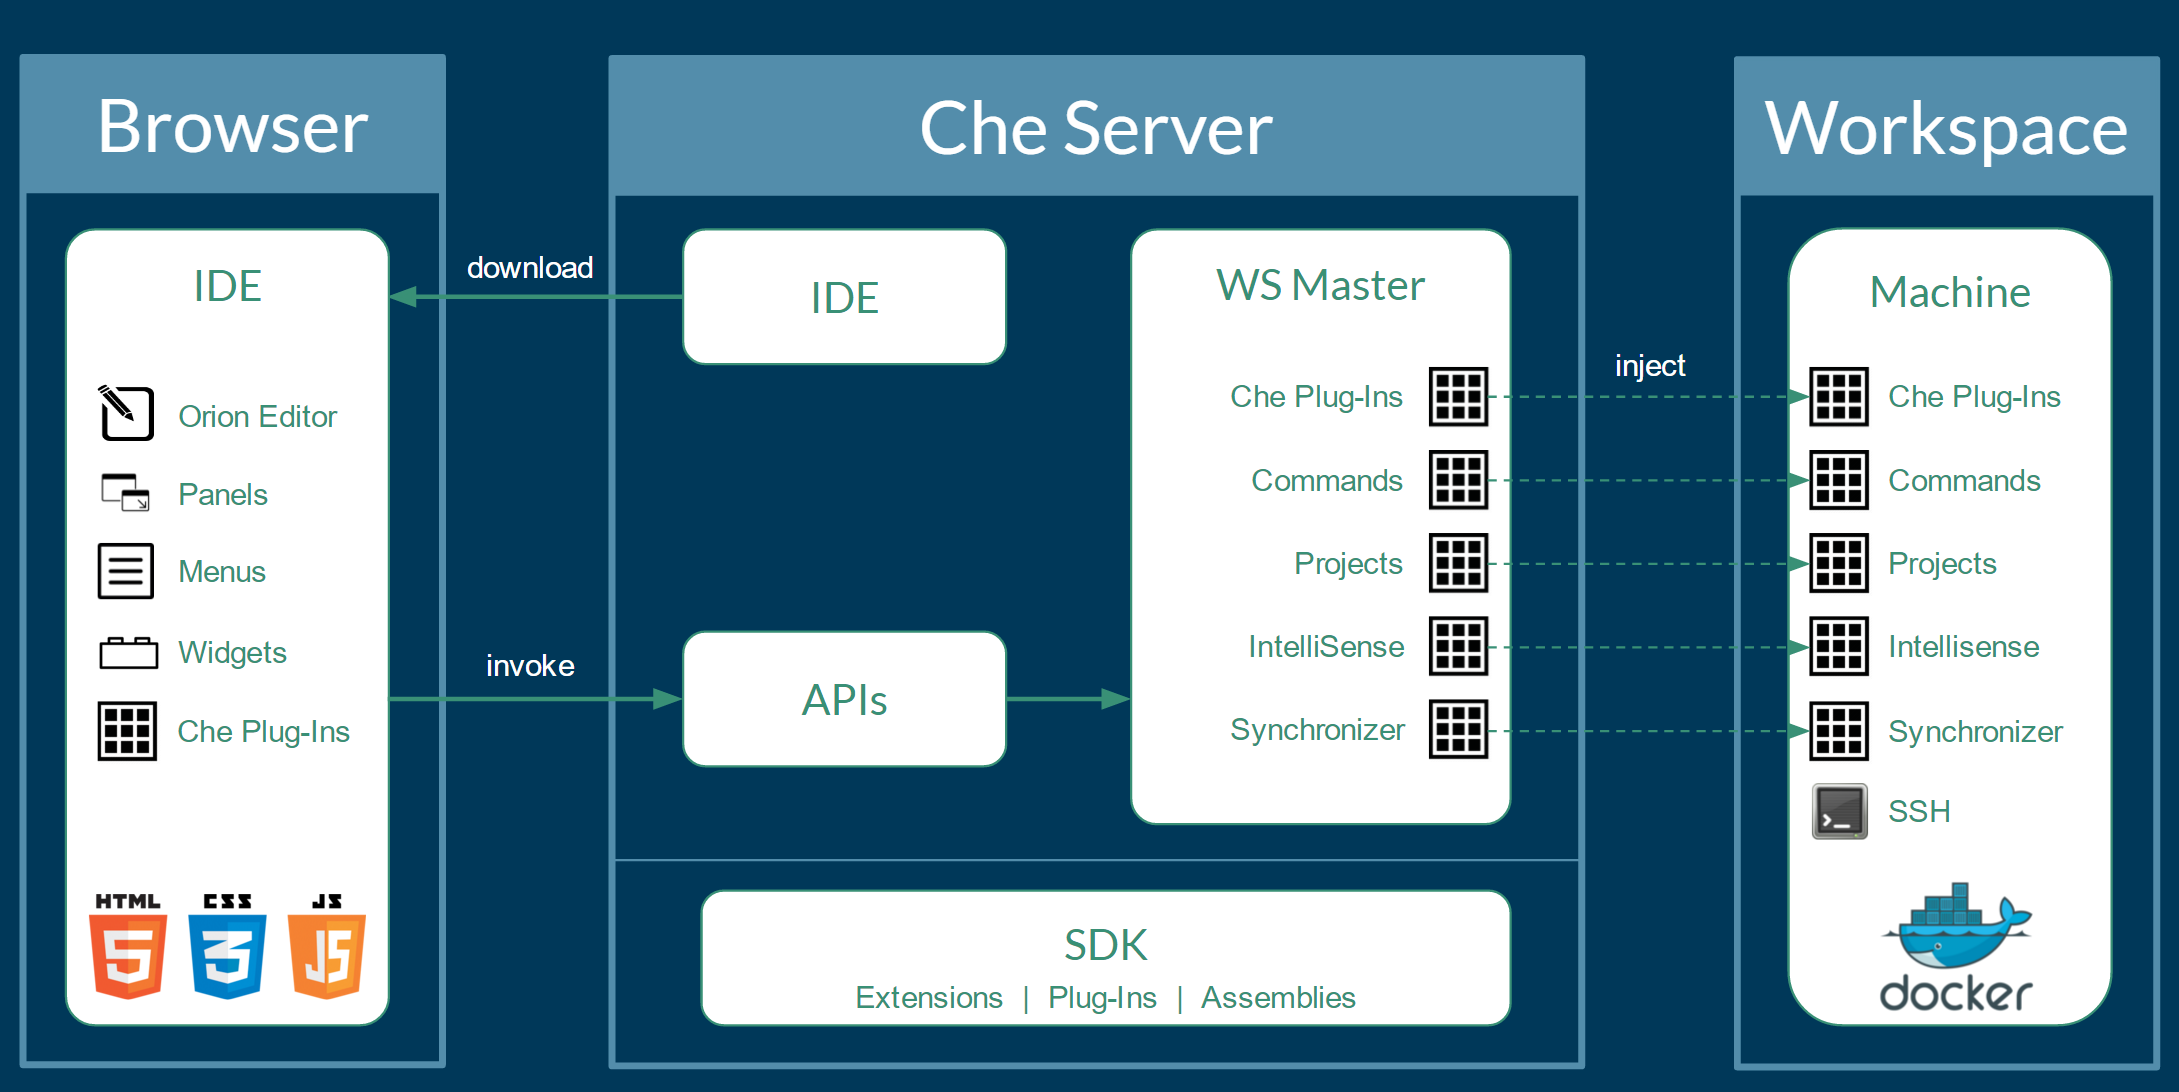
Eclipse was a heavy IDE and I was using it 10 years ago, when I was still a big fans of Java. I put it down for years but when i visit the site again I found there is an interesting project: Eclispe Che - http://eclipse.org/che . Unlike Atom or Sublime Text, it's not a editor or IDE but a development infrastructure. It's not necessary to install it in your PC or laptop, but another server or even in the cloud. Even you install it in your PC you just install a docker container and use a browser to work:


As you can see everything is in docker. For my case I can put it in my HP N54L and then I can code with any computers. The installation is pretty simple, I will show it in the next post.

Monday, August 29, 2016

Wordpress install by wp-cli (Command line only)

Prepare the database (mysql / mariadb)

  • mysql -u -p
  • create database wp_db1;
  • grant all on wp_db1.* to @'%' identified by ;

wp-cli

  • Download wp-cli at http://wp-cli.org/
  • wget https://raw.githubusercontent.com/wp-cli/builds/gh-pages/phar/wp-cli.phar
    
  • Move the file to /usr/local/bin (Or set $PATH to the location you want )
  • create the wordpress home (eg. /var/www/wordpress)
  • cd /var/www/wordpress
  • wp core download
  • wp core config --dbname=wp_db1 --dbuser= --dbpass= --dbprefix=wp
  • wp core install --url=""  --title="" --admin_user="<user>" --admin_password="<password>" --admin_email="<email>"</li> </ul> Now you can login WordPress with a browser for further configuration.<br><div> <p> <br></p> </div> <div> <p> <br></p> </div>

Friday, November 06, 2015

Sending Whatsapp Messages from Raspberry Pi

yowsup is the Whatsapp library. It is written in python so we can run even with a Raspberry Pi. After the installation there is a client script that we can send message to other Whatsapp user. 

Reasons to use yowsup:
  1. send messages to mobile device like SMS
  2. the cost is cheap: all we need is just a mobile number ( a number that has not been registered in Whatsapp) and a Raspberry Pi ( I am using Raspberry Pi B2, but any model should be found)
Installation

$ virtualenv2 venv/
New python executable in venv/bin/python2
Also creating executable in venv/bin/python
Installing setuptools, pip, wheel...done.
$ . venv/bin/activate
(venv)$ git clone https://github.com/tgalal/yowsup

Cloning into 'yowsup'...
remote: Counting objects: 6983, done.
remote: Total 6983 (delta 0), reused 0 (delta 0), pack-reused 6983
Receiving objects: 100% (6983/6983), 1.49 MiB | 574.00 KiB/s, done.
Resolving deltas: 100% (4388/4388), done.
Checking connectivity... done.

python setup.py  install

After the setup there will be a script "yowsup-cli"

Registration

Prepare the following information:
    • the phone number           (XXXXXXXX)
    • the country code             (CCC)
    • the mobile country code (mcc)
    • the mobile network code (mnc)

Note that the phone number is in the form of Country Code + Number. And the mcc and mnc can be found at https://en.wikipedia.org/wiki/Mobile_country_code

For example, if you are using Verizon LTE in US, that the mcc and mnc should be 310 and 012 respectively.

Run the command:
./yowsup-cli registration --requestcode sms --phone CCCXXXXXXXX --cc CCC --mcc 310 --mnc 012

INFO:yowsup.common.http.warequest:{"status":"sent","length":6,"method":"sms","retry_after":1805}

status: sent
retry_after: 1805
length: 6
method: sms


If you are lucky enough you will receive a SMS from the mobile phone.

With this WhatsApp code we can run another command:
./yowsup-cli registration --register 800-269 --phone CCCXXXXXXXX --cc CCC
INFO:yowsup.common.http.warequest:{"status":"ok","login":"CCCXXXXXXXX","pw":"kaiaCmXHgRxxxvuOfbbCFHlqbLI=","type":"new","expiration":1478245880,"kind":"free","price":"$1.00","cost":"1.00","currency":"USD","price_expiration":1449782266}

status: ok
kind: free
pw: kaiaCmXHgRxxxvuOfbbCFHlqbLI=
price: $1.00
price_expiration: 1449782266
currency: USD
cost: 1.00
expiration: 1478245880
login: CCCXXXXXXXX
type: new


Note that the line pw: xxxxxxxxxxxxx . That's the password we need to put in a config file.

create a file yowsup-cli.conf with the following content:

cc=CCC # The country code
phone=XXXXXXXX # the phone number
id= # 
password=xxxxxxxxxxx # the password

Finally we can test by sending a message to a Whatsapp user (eg. CCCYYYYYYYY):

./yowsup-cli demos -c yowsup-cli.conf -s YYYYYYY “hello world”


By using the simple command we can send Whatsapp message to another user programmatically. Possible usages are to send alerts when some health check jobs failed, or writing authentication apps that can send the passcode.

Ref:
  • https://github.com/tgalal/yowsup
  • https://en.wikipedia.org/wiki/Mobile_country_code


Friday, October 30, 2015

Using trickle to control the bandwidth usage of a particular process

Recently I have written a little python script to upload my photos to flickr using the flickr api. It was fun and I will share how to do it later. However when I started uploading 600 photos to flickr at home my wife complained the Internet speed was too slow. She said she could not watch youtube and even some foreign website!

Telling her to wait is not a solution ( I could be killed :p ). So I had stop the script and wait for the 'non-busy hour' to continue. However, this way is not practical, because it's hard to define a non-busy hour. In fact, mid night might not be good as well, because sometimes I need to have a conference call. Therefore, I tried to find if any tools that can limit the traffic so that the script will not upset our life.

Finally I found trickle and it totally solves my problem.

First, we have to install trickle.

Depending on the distributions:

  • pacman -S trickle
  • apt-get install trickle
  • yum install trickle

To run a program with limited bandwidth, just run:
$ trickle -s -u UPLOAD -d DOWNWORD THE_PROGRAM

in my case:

$ trickle -s -u 40 -d 40 python flickr_upload.py

-d and -u are to specify the download and upload speed respectively. Remember the unit is KB/s while your ISP usually use kbs as the unit. You will need to convert it in order to set a reasonable throughput for the process. You can check with this online conversion calculator

If you have a set of programs run by an user you can limit them buy running a trickled. For example:
$ trickled -u 40 -d 40
$

Then you can limit any program run by this user with this limit setting:
$ trickle program1

$ trickle program2
$ # more...

After limited the upload and download speed of my python script, everybody is satisfied. Though it takes much longer to upload photos to flickr, it's okay for me and my wife can browse and watch whatever she wants. Happy ending...

PS: 
Please note that trickle cannot resolve all cases. It only works when the application (the binary) is using the dynamic library glibc. To check if it is using the glibc, you can use the following command

$ ldd /usr/bin/python |grep libc
libc.so.6 => /usr/lib/libc.so.6 (0x00007f96a991f000)

If it is not using glibc, then you have find another way, probably using iptable or enable QoS on the router if it is supported

Ref:

  1. https://wiki.archlinux.org/index.php/Trickle
  2. http://linux.die.net/man/1/trickle

Thursday, September 24, 2015

12 Things do to after just started your DigitalOcean VPS

Recently I helped one of my client to setup a VPS on DigitalOcean (DO). The price is very competitive (the cheapest plan is $5 per month) and they offer SSD as the storage. I highly recommend to give a try if someone is looking for a virtual hosting.

Actually a VPS is just a server running on other location. Once you subscribe a plan and start to OS, it's your responsibility to maintain the system.

The steps below are to enhance the security once the server is deployed ( we are using Ubuntu 14.04 in this case). The objective is to harden the server so that it can only be accessed from a client with ssh

1. Setup ssh keyfrom a linux server at home or office. Assumed you have a linux client with a user "user1"

Friday, September 11, 2015

Benchmarking of Hard disks on N54L using Bonnie++

Getting the hard disk details

First we use smartctl to get the details, you can see there are 3 disks. 2x WD Green 2TB 5400rpm and 1x HP 500GB 7200rpm. The HP one is bundled and I think it's not enough for me to store my data So I buy the WD disks and make it as a mirror.

#smartctl -i /dev/sda
smartctl 6.4 2015-06-04 r4109 [x86_64-linux-3.14.51-1-lts] (local build)
Copyright (C) 2002-15, Bruce Allen, Christian Franke, www.smartmontools.org

=== START OF INFORMATION SECTION ===
Model Family:     Western Digital Green
Device Model:     WDC WD20EZRX-00D8PB0
Serial Number:    WD-xxxxxxxxxx
LU WWN Device Id: 5 0014ee 6055d1735
Firmware Version: 80.00A80
User Capacity:    2,000,398,934,016 bytes [2.00 TB]
Sector Sizes:     512 bytes logical, 4096 bytes physical
Rotation Rate:    5400 rpm
Device is:        In smartctl database [for details use: -P show]
ATA Version is:   ACS-2 (minor revision not indicated)
SATA Version is:  SATA 3.0, 6.0 Gb/s (current: 3.0 Gb/s)
Local Time is:    Fri Sep 11 17:09:32 2015 HKT
SMART support is: Available - device has SMART capability.
SMART support is: Enabled

Continue...

Friday, August 28, 2015

Pass Store (Password Manager in command line)


Everybody is facing a problem: too many password to remember. If there are too many to store in brian, then its time to store somewhere else. Some people will simply write on a notebook, some will store it in an excel, and some will download a password manager such as KeePass/KeePassX and LastPass. But as a Linux guy I would like to try another tool in command line: Pass (http://www.passwordstore.org/)

Why need a command line password manager? Having a command line password manager can provide flexibility:

  • you use SSH to connect to the Linux so it is secure and you can view a password of a particular account without touching a mouse
  • you can write simple script to deal with the passwords. for example, generate a number of account/ password pair, or dump a password list
  • This tool is very lightweight. You can store your passwords in a Raspberry Pi !


If you visit the website you may find it is not difficult to use. However, there are some tricks

1. You must setup gpg keyrings before initialising the pass store
2. The name of the pass store is the ID of the gpg key.

Once you setup the pass store you are good to enjoy this tool.

The following steps are the example:

Tuesday, August 25, 2015

HP Gen7 N54L Hardware Upgrade


I have a HP Gen7 N54L. Although Gen8 is released but it also makes N54L more attractive. It is a Microserver and it's worth to get one as a home server. There is a 4 bay enclosure. If you make use of the space of optical drive and the eSata output, the server can serve totally 6 SATA devices which is good enough for a storage server for a SME. 

Originally the configuration is a 4GB ECC memory with a 500GB Black disk. The CPU is AMD Turion(tm) II Neo N54L Dual-Core Processor. It is embedded in the mainboard so there is no way to upgrade it. Also, the main board doesn't have any USB3.0, which is not acceptable nowadays. 

So what can we do in order to make it more productive? For me, I have purchased the following :
  • 2x 2TB Green disks (with software raid, will explain later)
  • Add 4GB non-ECC memory (totally 8GB)
  • Add a USB3.0 pci low profile adapter
I also upgraded the BIOS which can make the harddisks hot pluggable. 

Since I need some time to make a short procedure for the hardware, I just show the result at the moment.

# free
total used free shared buff/cache available
Mem: 8052260 826372 6648096 14800 577792 6854592
Swap: 0 0 0
# lspci |grep -i USB.3
02:00.0 USB controller: Renesas Technology Corp. uPD720202 USB 3.0 Host Controller (rev 02)

Of course I am a Linux guy so it is expected I installed a Linux on it. You can see there are 6GB free right now. And I can even use the USB3.0 ports to connect more hard disks (to backup, for example).

Friday, June 28, 2013

Restore HP-UX from ignite tape (with screen dump)

 Objective

To restore HP-UX (11i, 11.23 should work) from a backup (make_tape_recovery)

  1. Login MP console and recycle it
  2. "CO" to console
  3. Within that "10 seconds", press any key and see the menu
    ---- Main Menu ---------------------------------------------------------------
    
         Command                           Description
         -------                           -----------
         BOot [PRI|ALT|]             Boot from specified path
         PAth [PRI|ALT] []           Display or modify a path
         SEArch [DIsplay|IPL] []     Search for boot devices
    
         COnfiguration menu                Displays or sets boot values
         INformation menu                  Displays hardware information
         SERvice menu                      Displays service commands
    
         DIsplay                           Redisplay the current menu
         HElp [|]           Display help for menu or command
         RESET                             Restart the system
    ----
    Main Menu: Enter command or menu > sea
  4. Insert the tape and run "SEA" to search devices
    Main Menu: Enter command or menu > SEA
    
    Searching for potential boot device(s)
    This may take several minutes.
    
    To discontinue search, press any key (termination may not be immediate).
    
    
                                                                               IODC
       Path#  Device Path (dec)  Device Path (mnem)  Device Type               Rev
       -----  -----------------  ------------------  -----------               ----
       P0     0/0/2/0.0          ide.0               Random access media       1    
       P1     0/1/1/0.0          intscsia.0          Random access media       1    
       P2     0/1/1/1.4          intscsib.4          Sequential access media   1    
    
    
    Main Menu: Enter command or menu >
  5. "P2 0/1/1/1.4 intscsib.4 Sequential access media 1" -> which is the tape drive

OpenVPN server setup on Raspberry Pi

Note: it is for bridge mode only


I found that Raspberry Pi is a good choice for setup OpenVPN server. I can always power on it as the power consumption is low. After setting it up, I can connect VPN to home in office or cafe outside. 

You may think port forwarding by router or via SSH is good enough. However, there are limitations when:
  1. there are lots of services you want to connect from outsider, then your port forwarding rules will be massive
  2. as the OpenVPN client can reconnect automatically, I can have a relative stable connection. Sometimes you would like to have a reserve connect from server to client. My own experience is that in my previous company, I setup OpenVPN client in office and connect to my home, leave the connection alive. Then when I go home I can reconnect to my office PC by remote desktop :)

Objective

  • Internal network: 192.168.28.0/24
  • Setup a OpenVPN server such that client connection will connect to the server and assign a 192.168.28.0/24 IP as if it is within the internal network
  • necessary install
    apt-get install  bridge-utils openvpn 

Tuesday, June 18, 2013

Cisco MDS port zoning 101

Objective

  • There are two FC ports (fd0, fd1) on a hp-ux rp3410 (hostname: rp3410 :) )
  • The storage is EMC VNX5100, we will use SPA P1/P2 and SPB P1/P2.

Physical connection

  • rp3410 fd0 will connect to SW1 port 1/7
  • rp3410 fd1 will connect to SW2 port 1/7
  • VNX5100 SPA P1 on SW1 port 1/1
  • VNX5100 SPB P1 on SW1 port 1/2
  • VNX5100 SPA P2 on SW2 port 1/1
  • VNX5100 SPB P2 on SW2 port 1/2

Switch configuration:

We will create 4 zones, 2 on each switch: The zoneset is "full-zoneset"

SW1 wwn is 20:00:xx:xx:xx:xx:xx:xx
SW2 wwn is 20:00:yy:yy:yy:yy:yy:yy

The VSAN of SW1 is 201, SW2 is 202

(it is port zoning, for soft zoning by wwn, it will be ready later)

SW1:
config t

vsan database
vsan 201 interface 1/7
 
interface 1/7
no shutdown
switchport mode F
switchport description "rp3410_fd0"

zone name rp3410_fd0_VNX5100_VNX_SPA1 vsan 201
member interface fc 1/1 swwn 20:00:xx:xx:xx:xx:xx:xx
member interface fc 1/7 swwn 20:00:xx:xx:xx:xx:xx:xx

zone name rp3410_fd0_VNX5100_VNX_SPB1 vsan 201
member interface fc 1/2 swwn 20:00:xx:xx:xx:xx:xx:xx
member interface fc 1/7 swwn 20:00:xx:xx:xx:xx:xx:xx

zoneset name full-zoneset vsan 201
memeber rp3410_fd0_VNX5100_VNX_SPA1
memeber rp3410_fd0_VNX5100_VNX_SPB1
zoneset activate name full-zoneset
 
SW2
config t

vsan database
vsan 202 interface 1/7

interface 1/7
no shutdown
switchport mode F
switchport description "rp3410_fd1"

zone name rp3410_fd1_VNX5100_VNX_SPA2 vsan 202
member interface fc 1/1 swwn 20:00:yy:yy:yy:yy:yy:yy
member interface fc 1/7 swwn 20:00:yy:yy:yy:yy:yy:yy

zone name rp3410_fd1_VNX5100_VNX_SPB2 vsan 202
member interface fc 1/2 swwn 20:00:yy:yy:yy:yy:yy:yy
member interface fc 1/7 swwn 20:00:yy:yy:yy:yy:yy:yy

zoneset name full-zoneset vsan 202
memeber rp3410_fd1_VNX5100_VNX_SPA2 vsan 202
memeber rp3410_fd1_VNX5100_VNX_SPB2 vsan 202
zoneset activate name full-zoneset

Wednesday, May 08, 2013

Update MoinMoin from 1.9.5 to 1.9.7

This is the general steps for updating moinmoin from 1.9.5 to 1.9.7

  1. Stop web server or standalone process
  2. backup wiki instance (eg. mywiki or instance1)
  3. backup moinmoin installation path
  4. if there is customized logo, backup it as well (eg. moinmoin.png)
  5. delete *.pyc or *.pyo
    find  -name *.pyc -exec rm {} \; 
  6. download moinoin1.9.7 and install to existing path
    python setup.py install --prefix 
  7. replace moinmoin.png if necessary
  8. if using web server, remember to change the static path from "/moin_static195" to "/moin_static197"
  9. start web server or standalone process
  10. double check the version by http:///SystemInfo

Monday, February 18, 2013

Setup Trac on Raspberry Pi as a Wiki and Issue Tracking Tool

Trac with GIT

Trac is a wiki and issue tracking tool. There are other choices such as redmind and mantisbt. However, Trac is the most suitable one for running on Raspberry Pi because:
  1. it is run by python, which is installed by default for raspbian. (php and ruby are not required)
  2. it is relatively light weight. It can use sqlite as the database, rather than MySQL or PostgresSQL.
  3. it can be run in standalone mode, without using apache or lighttpd. (although I will still use lighttpd to 'proxy' Trac)
  4. It supports modern version control tool such as Subversion and GIT. (redmine also supports, but again, it's not that light weight)
  5. with making use of virtual environment (virutalenv), you can setup Trac without using a privilege account.
  6. it is a mature product and many organizations are using it (http://trac.edgewall.org/wiki/TracUsers)

Install and setup Trac

First, make sure virtualenv is already installed. (apt-get install virtualenv)

Remove a file completely in GIT

GIT is a great version control tool. I was a CVS and SVN users but I think GIT is even more powerful. Perhaps I can write something about GIT but now I want to share an experience: How to remove a file completely from GIT.

There is an internal db in GIT. Once your add and commit codes into the repository, the info will be store and the great thing is that you can check out the file at any version. However, I did an stupid thing - I hard coded some personal information (eg password) in a file and commit it to the repository. It won't be a problem if you are the only developer of the project.  But if you need to share the code by cloning the repository to the others, your information can be retrieved, even you delete it in filesystem.

So I did some quick search and find a solution: just runt the following command to remove the history and file:

git filter-branch --index-filter "git rm -rf --cached --ignore-unmatch " HEAD

Make sure you make a copy to some places out of the GIT repository. Then you can copy the file back and add it as a "fresh new" file.

PS. As a better practice, don't hard coded any thing that cannot be shared in a repository !!

Tuesday, January 29, 2013

Getting Serial Number of HP-UX (works on RP5470 - HP11i PA-RISC)

HP-UX 11i is now pretty old but it is surprised that there are still a lot of companies using it. Though it is stable but hardware failure is something unpreventable. Once you found hardware fault, you probably need to call vendors (HP or others) to diagnostics.

A typical question will be "what is your server model? OS? Serial number?" Here is the quick answer:

OS Version: uname -a
Model: model (yes, simple?)
Serial Number: no single command to get it. but the information can be retrieved in cstm:
echo "sel path system\ninfolog\nexit"|cstm|grep "System Serial Number"

eg.
# uname -a
HP-UX zzzzzzzzz B.11.11 U 9000/800 106424635 unlimited-user license
# model
9000/800/L3000-8x
# echo "sel path system\ninfolog\nexit"|cstm|grep "System Serial Number"
   System Serial Number...: xxxxxxxxxx
 

Thursday, November 29, 2012

Remote access to your Raspberry Pi with ssl/ssh multiplexer

One big advantage of Raspberry Pi is its low power consumption. I can power on it 7x24 and remote it at anytime (of course, assumed your router is also on). SSH from internet to your Pi is simple, by just forwarding port 22 or making the Pi is the default DMZ. However, some places only allows you to visit port 80 or 443, or you have to connect to the internal via a proxy server, which also blocks every ports but 80/443.

Since port 443 is an exception, why don't we set the SSH service to listen to it? Just modify /etc/ssh/sshd_config and add a line "Port 80" or "Port 443". It does work, but wait, what about if the Pi also serves as a Web Server with SSL enabled? If you choose 443 to serve SSH, then you can't have your web server to use SSL at 443. So how to solve this situation? Here is one of the possible approach.