Showing posts with label N54L. Show all posts

Thursday, July 27, 2017

Running ipfire in a Proxmox KVM

Long ago my network equipment at home was simple: just used a Belkin N600 router to connect to my ISP. All my computers and devices, including some raspberry pi, mobile phones and pads will access the internet via the router. As the number of clients increased, I found that the Belkin router did not serve well. Therefore I installed a software firewall, IPFire, on a Raspberry Pi (Model B) and replace the existing router. (I still needed the N600 as a wireless bridge so I switch it to a bridge mode)

IPFire is a great software firewall. You can have a look at the website so see the features. Running IPFire on Raspberry Pi is surprisingly stable too. Everything was fine until I change the ISP plan from 8M (8mbps/1mbps)  to 100M (100mbps/30mbps).

The problem was the hardware limitation of the Raspberry Pi. The builtin LAN and another usb ethernet adapter worked fine when I was using 8M. However after I changed to use the 100M plan I found that the maximum speed was 30M something. In order to utilize my bandwidth I planned to run IPFire on another hardware.

I didn't have a big budget at that time so I wondered if I can make use of my existing hardware. My N54L that is running proxmox seems to be a good choice. So I decided to create a KVM for this.

The config of the IPFire VM is simple:
1. 512M ram
2. 1 CPU
3. 16GB virtual disk (virtio driver)
4. one bridged network (virtio driver)

One tricky thing I have done was to passthrough USB adapter from host to the VM, which should have a better performance.

By running lsusb on host:
# lsusb
...
Bus 003 Device 002: ID 0bca:8133 Realtek Semiconductor Corp. RTL8153 Gigabit Ethernet Adapter
Bus 003 Device 001: ID 1d6b:0003 Linux Foundation 3.0 root hub
...
Then add a line at /etc/pve/qemu-server/.conf
usb0: host=0bca:8133,usb3=yes

note that only use "usb3=yes" if you are using a usb3 device.

When the setting was done, I started the VM, the USB adapter was detected and just followed the instruction to setup. In my case I connected USB adapter to RED (internet), the virtual adapter to GREEN (internal). As I did a IPFire configuration backup from raspberry pi. I just import it back to the VM and everything ran out of the box!

I did a quick test by running the command line version of speedtest (speedtest-cli). the result was 80mpbs/26mbps which is acceptable.

[root@ipfire ~]# ./speedtest-cli
Retrieving speedtest.net configuration...
Testing from XXXXXXX (xxx.xxx.xx.xxx)...
Retrieving speedtest.net server list...
Selecting best server based on ping...
Hosted by xxxxxxxx[22.51 km]: 8.898 ms
Testing download speed................................................................................
Download: 81.54 Mbit/s
Testing upload speed................................................................................................
Upload: 25.93 Mbit/s

In summary IPFire is a good solution if you want to have a software firewall. There are other free firewalls such as pfsense or opnsense. I will try them and compare. But for now, I am happy to use IPFire.

Thursday, September 01, 2016

Eclipse Che setup - on a server with Docker

If you take a look at the official site you'll see the installation is super easy - just a single line:

docker run --rm -t -v /var/run/docker.sock:/var/run/docker.sock eclipse/che start

Of course it is assumed that you have Docker 1.8 or later installed.

If you run it in your desktop or laptop, you can start using it. Just go to "http://localhost:8080" and create a workspace for your development:


Since I am going to install it on my HP N54L server (ArchLinux), I need to put from environment variables:

docker run --rm -t -e CHE_HOST_IP= -v /var/run/docker.sock:/var/run/docker.sock  eclipse/che  stop

Then I can go ot "http://:8080" to enjoy this web IDE.

Another thing I discover is that if you run "docker ps" you will see:

CONTAINER ID        IMAGE                                                                       COMMAND                  CREATED             STATUS              PORTS                                                                                                                       NAMES
6b5cf5c1c0e9        eclipse-che/workspacef2v2k7ltal4gbsxp_machineph3hokyhknjhxa90_che_default   "/home/user/entrypoin"   42 hours ago        Up 42 hours         0.0.0.0:32817->22/tcp, 0.0.0.0:32816->4401/tcp, 0.0.0.0:32815->4403/tcp, 0.0.0.0:32814->4411/tcp, 0.0.0.0:32813->8080/tcp   workspacef2v2k7ltal4gbsxp_machineph3hokyhknjhxa90_che_default
ac63c449f4b8        codenvy/che-server:latest                                                   "/home/user/che/bin/c"   42 hours ago        Up 42 hours         8000/tcp, 0.0.0.0:8080->8080/tcp                                                                                            che-server


Just remember do not stop it by running "docker stop che-server". I did once and when I start the che-server my previous setting, including workpsaces and projects were gone.

Instead, we should run 

docker run --rm -t -e CHE_HOST_IP= -v /var/run/docker.sock:/var/run/docker.sock  eclipse/che  stop

Or simply download the start/stop script from eclipse.org:

curl -sL https://raw.githubusercontent.com/eclipse/che/master/che.sh > che
then run
 ./che start / stop / restart

for my case I need to set the environemnt:
CHE_HOST_IP=je54 ./che  start
CHE_HOST_IP=je54 ./che  stop

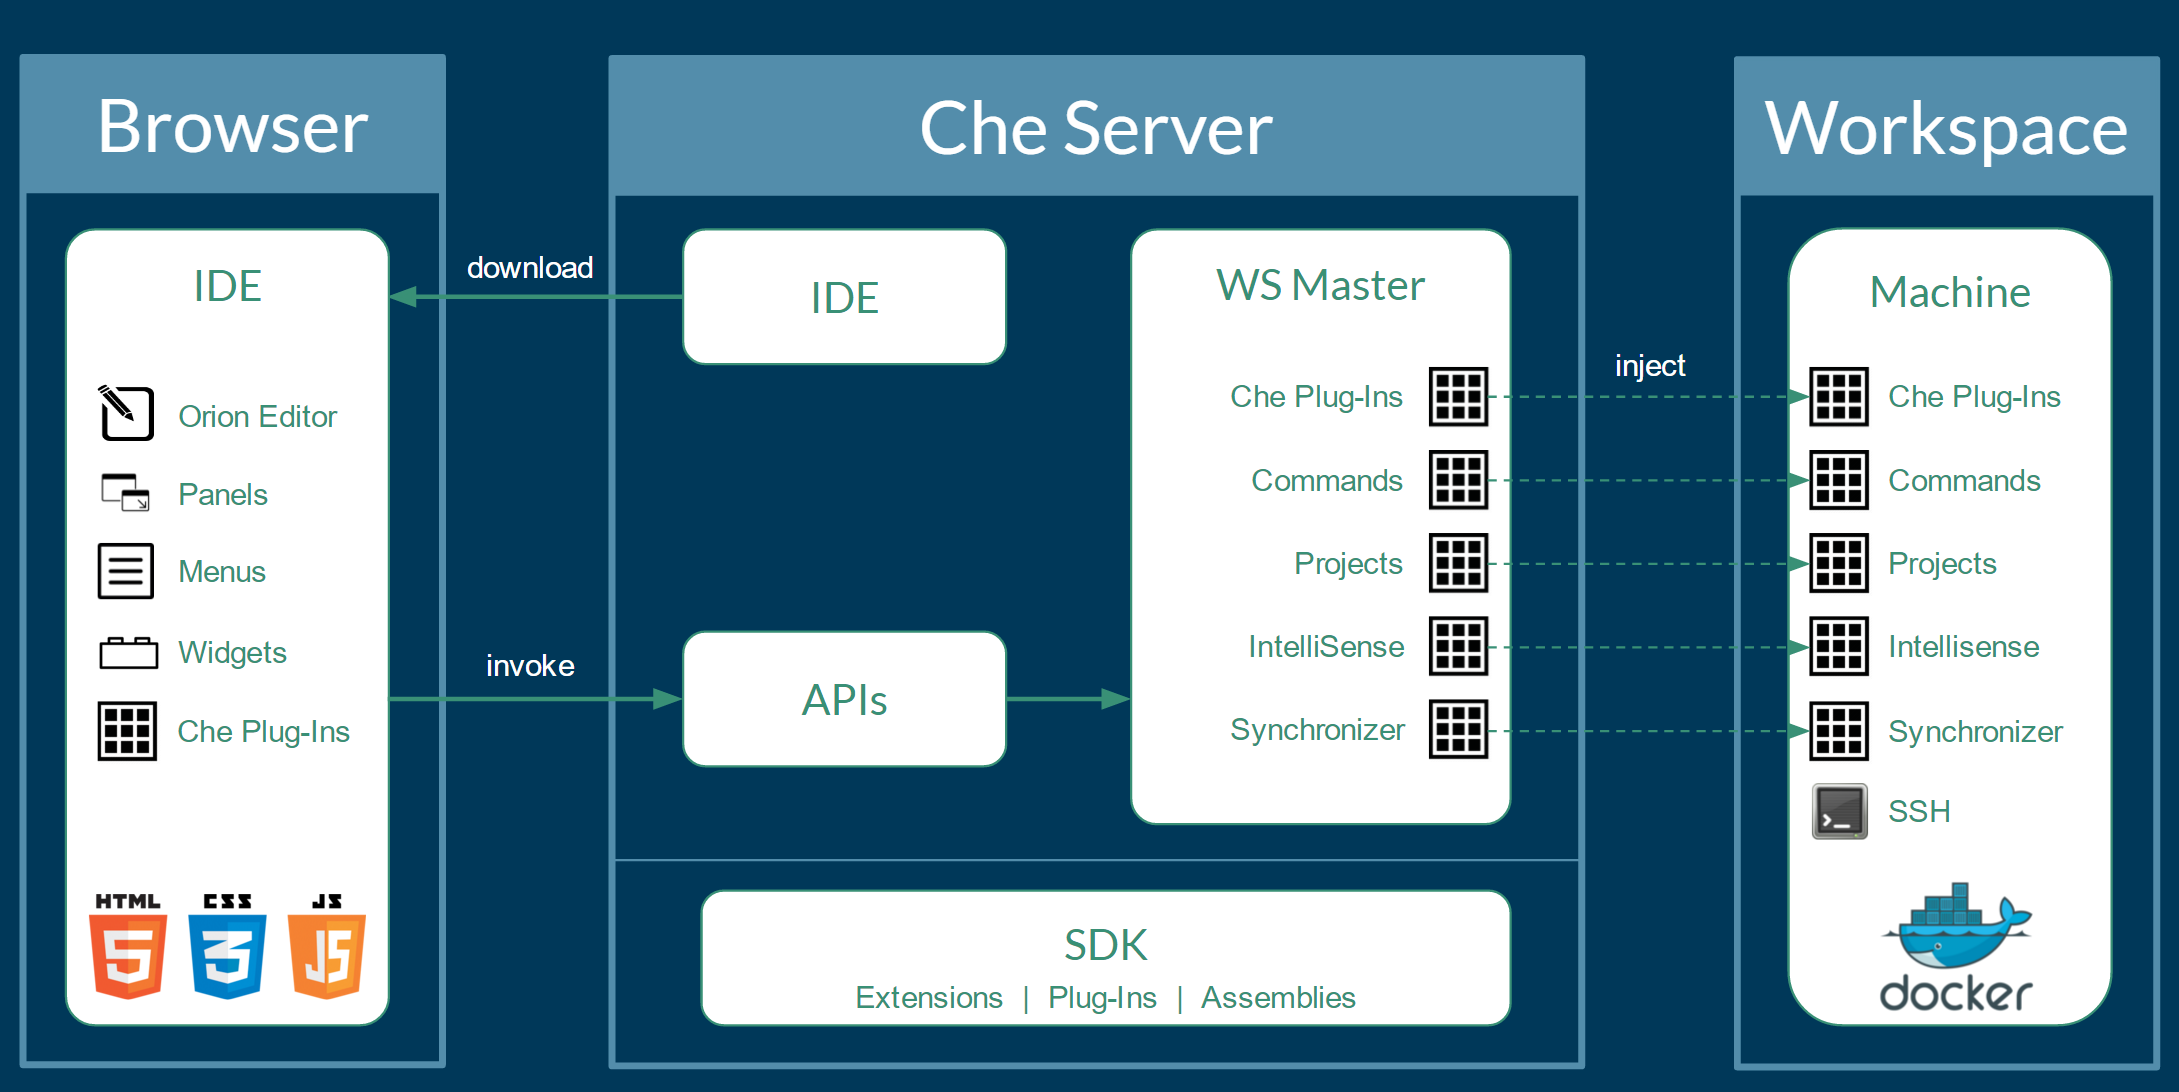
Eclipse Che (coding within a browser)

I am not a professional programmer or developer. But I do need to code time to time. 90% of my coding is done with "vi". It's very powerful if the project is small. I also tried atom.io or sublime text, but they are just too powerful that I don't want to invest too much time. Then I found Eclipse Che.

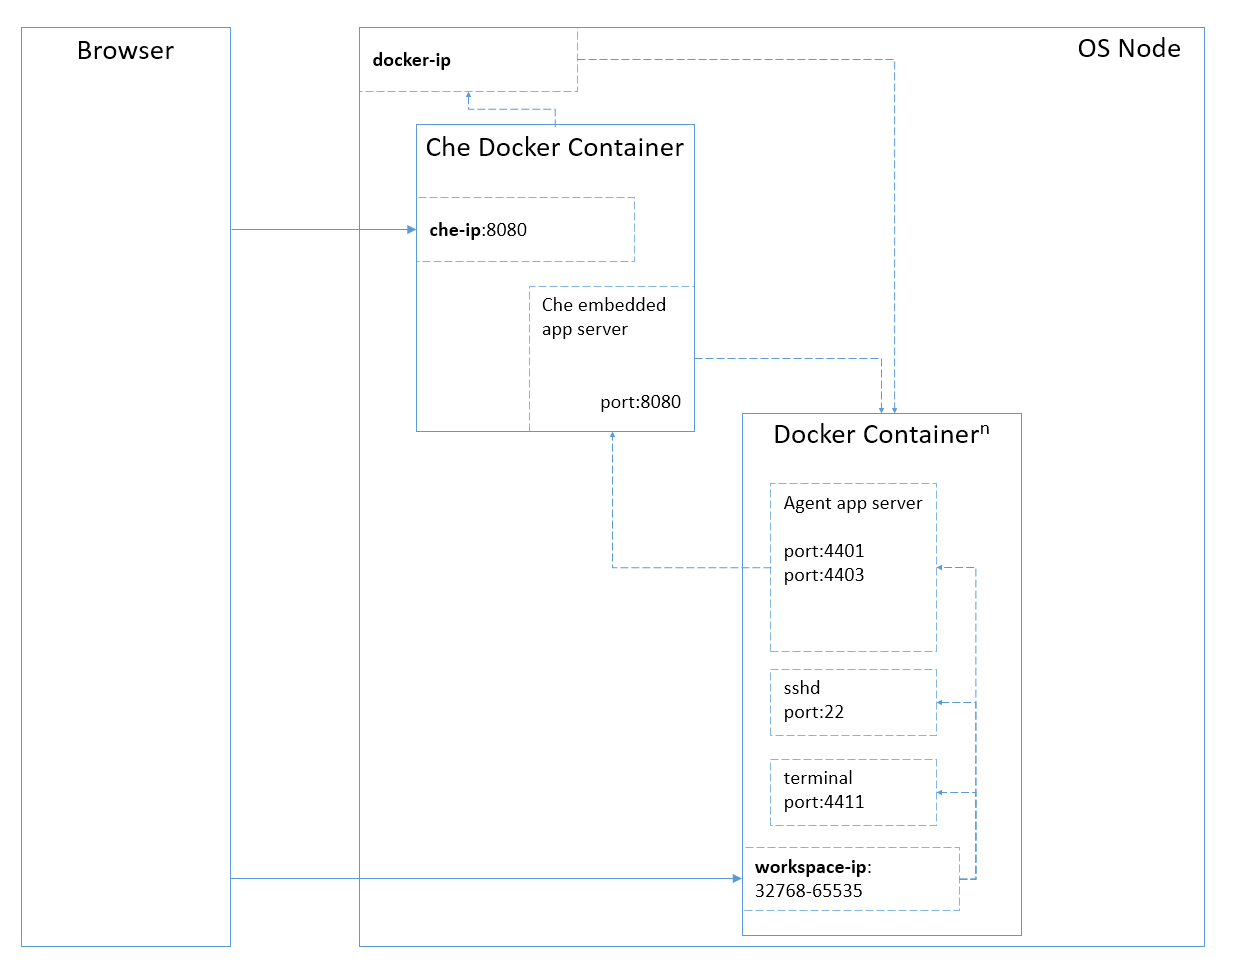
Eclipse was a heavy IDE and I was using it 10 years ago, when I was still a big fans of Java. I put it down for years but when i visit the site again I found there is an interesting project: Eclispe Che - http://eclipse.org/che . Unlike Atom or Sublime Text, it's not a editor or IDE but a development infrastructure. It's not necessary to install it in your PC or laptop, but another server or even in the cloud. Even you install it in your PC you just install a docker container and use a browser to work:


As you can see everything is in docker. For my case I can put it in my HP N54L and then I can code with any computers. The installation is pretty simple, I will show it in the next post.

Friday, September 11, 2015

Benchmarking of Hard disks on N54L using Bonnie++

Getting the hard disk details

First we use smartctl to get the details, you can see there are 3 disks. 2x WD Green 2TB 5400rpm and 1x HP 500GB 7200rpm. The HP one is bundled and I think it's not enough for me to store my data So I buy the WD disks and make it as a mirror.

#smartctl -i /dev/sda
smartctl 6.4 2015-06-04 r4109 [x86_64-linux-3.14.51-1-lts] (local build)
Copyright (C) 2002-15, Bruce Allen, Christian Franke, www.smartmontools.org

=== START OF INFORMATION SECTION ===
Model Family:     Western Digital Green
Device Model:     WDC WD20EZRX-00D8PB0
Serial Number:    WD-xxxxxxxxxx
LU WWN Device Id: 5 0014ee 6055d1735
Firmware Version: 80.00A80
User Capacity:    2,000,398,934,016 bytes [2.00 TB]
Sector Sizes:     512 bytes logical, 4096 bytes physical
Rotation Rate:    5400 rpm
Device is:        In smartctl database [for details use: -P show]
ATA Version is:   ACS-2 (minor revision not indicated)
SATA Version is:  SATA 3.0, 6.0 Gb/s (current: 3.0 Gb/s)
Local Time is:    Fri Sep 11 17:09:32 2015 HKT
SMART support is: Available - device has SMART capability.
SMART support is: Enabled

Continue...

Tuesday, August 25, 2015

HP Gen7 N54L Hardware Upgrade


I have a HP Gen7 N54L. Although Gen8 is released but it also makes N54L more attractive. It is a Microserver and it's worth to get one as a home server. There is a 4 bay enclosure. If you make use of the space of optical drive and the eSata output, the server can serve totally 6 SATA devices which is good enough for a storage server for a SME. 

Originally the configuration is a 4GB ECC memory with a 500GB Black disk. The CPU is AMD Turion(tm) II Neo N54L Dual-Core Processor. It is embedded in the mainboard so there is no way to upgrade it. Also, the main board doesn't have any USB3.0, which is not acceptable nowadays. 

So what can we do in order to make it more productive? For me, I have purchased the following :
  • 2x 2TB Green disks (with software raid, will explain later)
  • Add 4GB non-ECC memory (totally 8GB)
  • Add a USB3.0 pci low profile adapter
I also upgraded the BIOS which can make the harddisks hot pluggable. 

Since I need some time to make a short procedure for the hardware, I just show the result at the moment.

# free
total used free shared buff/cache available
Mem: 8052260 826372 6648096 14800 577792 6854592
Swap: 0 0 0
# lspci |grep -i USB.3
02:00.0 USB controller: Renesas Technology Corp. uPD720202 USB 3.0 Host Controller (rev 02)

Of course I am a Linux guy so it is expected I installed a Linux on it. You can see there are 6GB free right now. And I can even use the USB3.0 ports to connect more hard disks (to backup, for example).